Quick Start
Get your first OpenLogos project up and running — from install to your first AI-generated requirements document.
Time required: ~10 minutes
Prerequisites
Section titled “Prerequisites”- Node.js >= 18
- An AI coding tool — one of the following:
- Claude Code (terminal-based)
- OpenCode (terminal-based)
- Codex CLI (terminal-based)
- Cursor (IDE with built-in AI)
Step 1: Install
Section titled “Step 1: Install”npm install -g @miniidealab/openlogosVerify the installation:
openlogos --versionStep 2: Initialize a project
Section titled “Step 2: Initialize a project”Run the init command — it will ask you to choose a language and AI tool:
Choose All when you want one project to deploy Claude Code, OpenCode, Codex, and Cursor targets together.
openlogos init my-project
Choose language / 选择语言:  1. English (default)  2. 中文
Your choice [1/2] (default: 1): 1
Choose AI coding tool / 选择 AI 编码工具:  1. Claude Code (default)  2. OpenCode  3. Codex  4. Cursor  5. Other  6. All (deploy for all tools)
Your choice [1/2/3/4/5/6] (default: 1): 1
Creating OpenLogos project structure for "my-project"...
  ✓ logos/resources/prd/1-product-requirements/  ✓ logos/resources/prd/2-product-design/1-feature-specs/  ✓ logos/resources/prd/2-product-design/2-page-design/  ✓ logos/resources/prd/3-technical-plan/1-architecture/  ✓ logos/resources/prd/3-technical-plan/2-scenario-implementation/  ✓ logos/resources/api/  ✓ logos/resources/database/  ✓ logos/resources/test/  ✓ logos/resources/scenario/  ✓ logos/resources/verify/  ✓ logos/changes/  ✓ logos/changes/archive/  ✓ logos/logos.config.json  ✓ logos/logos-project.yaml  ✓ AGENTS.md  ✓ CLAUDE.md  ✓ 16 skills deployed to logos/skills/  ✓ 13 specs deployed to logos/spec/
Project initialized. Next steps:  1. Review logos/logos.config.json to verify project settings  2. Start with Phase 1: tell AI "Help me write requirements"  3. Run `openlogos status` to check progress at any time
💡 Claude Code users: install the native plugin for the best experience:  /plugin marketplace add miniidealab/openlogos  /plugin install openlogos@miniidealab-openlogos
openlogos init my-project
Choose language / 选择语言: 1. English (default) 2. 中文
Your choice [1/2] (default: 1): 1
Choose AI coding tool / 选择 AI 编码工具: 1. Claude Code (default) 2. OpenCode 3. Codex 4. Cursor 5. Other 6. All (deploy for all tools)
Your choice [1/2/3/4/5/6] (default: 1): 2
Creating OpenLogos project structure for "my-project"...
✓ logos/resources/prd/1-product-requirements/ ✓ logos/resources/prd/2-product-design/1-feature-specs/ ✓ logos/resources/prd/2-product-design/2-page-design/ ✓ logos/resources/prd/3-technical-plan/1-architecture/ ✓ logos/resources/prd/3-technical-plan/2-scenario-implementation/ ✓ logos/resources/api/ ✓ logos/resources/database/ ✓ logos/resources/test/ ✓ logos/resources/scenario/ ✓ logos/resources/verify/ ✓ logos/changes/ ✓ logos/changes/archive/ ✓ logos/logos.config.json ✓ logos/logos-project.yaml ✓ AGENTS.md ✓ CLAUDE.md ✓ 16 skills deployed to logos/skills/ ✓ OpenCode plugin deployed to .opencode/plugins/openlogos.js + opencode.json ✓ opencode.json created with recommended permission defaults ✓ OpenCode slash commands deployed to .opencode/commands/ (10 files) ✓ 13 specs deployed to logos/spec/
Project initialized. Next steps: 1. Review logos/logos.config.json to verify project settings 2. Start with Phase 1: tell AI "Help me write requirements" 3. Run `openlogos status` to check progress at any timeopenlogos init my-project
Choose language / 选择语言: 1. English (default) 2. 中文
Your choice [1/2] (default: 1): 1
Choose AI coding tool / 选择 AI 编码工具: 1. Claude Code (default) 2. OpenCode 3. Codex 4. Cursor 5. Other 6. All (deploy for all tools)
Your choice [1/2/3/4/5/6] (default: 1): 4
Creating OpenLogos project structure for "my-project"...
✓ logos/resources/prd/1-product-requirements/ ✓ logos/resources/prd/2-product-design/1-feature-specs/ ✓ logos/resources/prd/2-product-design/2-page-design/ ✓ logos/resources/prd/3-technical-plan/1-architecture/ ✓ logos/resources/prd/3-technical-plan/2-scenario-implementation/ ✓ logos/resources/api/ ✓ logos/resources/database/ ✓ logos/resources/test/ ✓ logos/resources/scenario/ ✓ logos/resources/verify/ ✓ logos/changes/ ✓ logos/changes/archive/ ✓ logos/logos.config.json ✓ logos/logos-project.yaml ✓ AGENTS.md ✓ CLAUDE.md ✓ 16 skills deployed to .cursor/rules/ ✓ 13 specs deployed to logos/spec/
Project initialized. Next steps: 1. Review logos/logos.config.json to verify project settings 2. Start with Phase 1: tell AI "Help me write requirements" 3. Run `openlogos status` to check progress at any timeNow enter the project and check its status:
cd my-projectopenlogos status📊 OpenLogos Project Status
──────────────────────────────────────────────────🔲 Phase 1 · Requirements (WHY)🔲 Phase 2 · Product Design (WHAT)🔲 Phase 3-0 · Architecture🔲 Phase 3-1 · Scenario Modeling🔲 Phase 3-2 · API Design🔲 Phase 3-2 · Database Design🔲 Phase 3-3a · Test Case Design (Unit + Scenario)🔲 Phase 3-3b · API Orchestration Tests🔲 Phase 3-4 · Code Implementation + Test Code🔲 Phase 3-5 · Test Acceptance (verify)──────────────────────────────────────────────────
💡 Suggested next step: Phase 1 · Requirements (WHY) → Tell AI: "Help me write requirements"Everything is empty — that’s expected. The methodology will guide you through each phase in order.
Step 3: Open in your AI tool
Section titled “Step 3: Open in your AI tool”Open the project in your chosen AI tool. Say something like “please help me have a look at this project” — the AI will automatically detect OpenLogos and show you the project status.
Navigate to the project in your terminal and start Claude Code:
cd my-projectclaudeClaude Code reads AGENTS.md on startup and automatically detects the OpenLogos project:
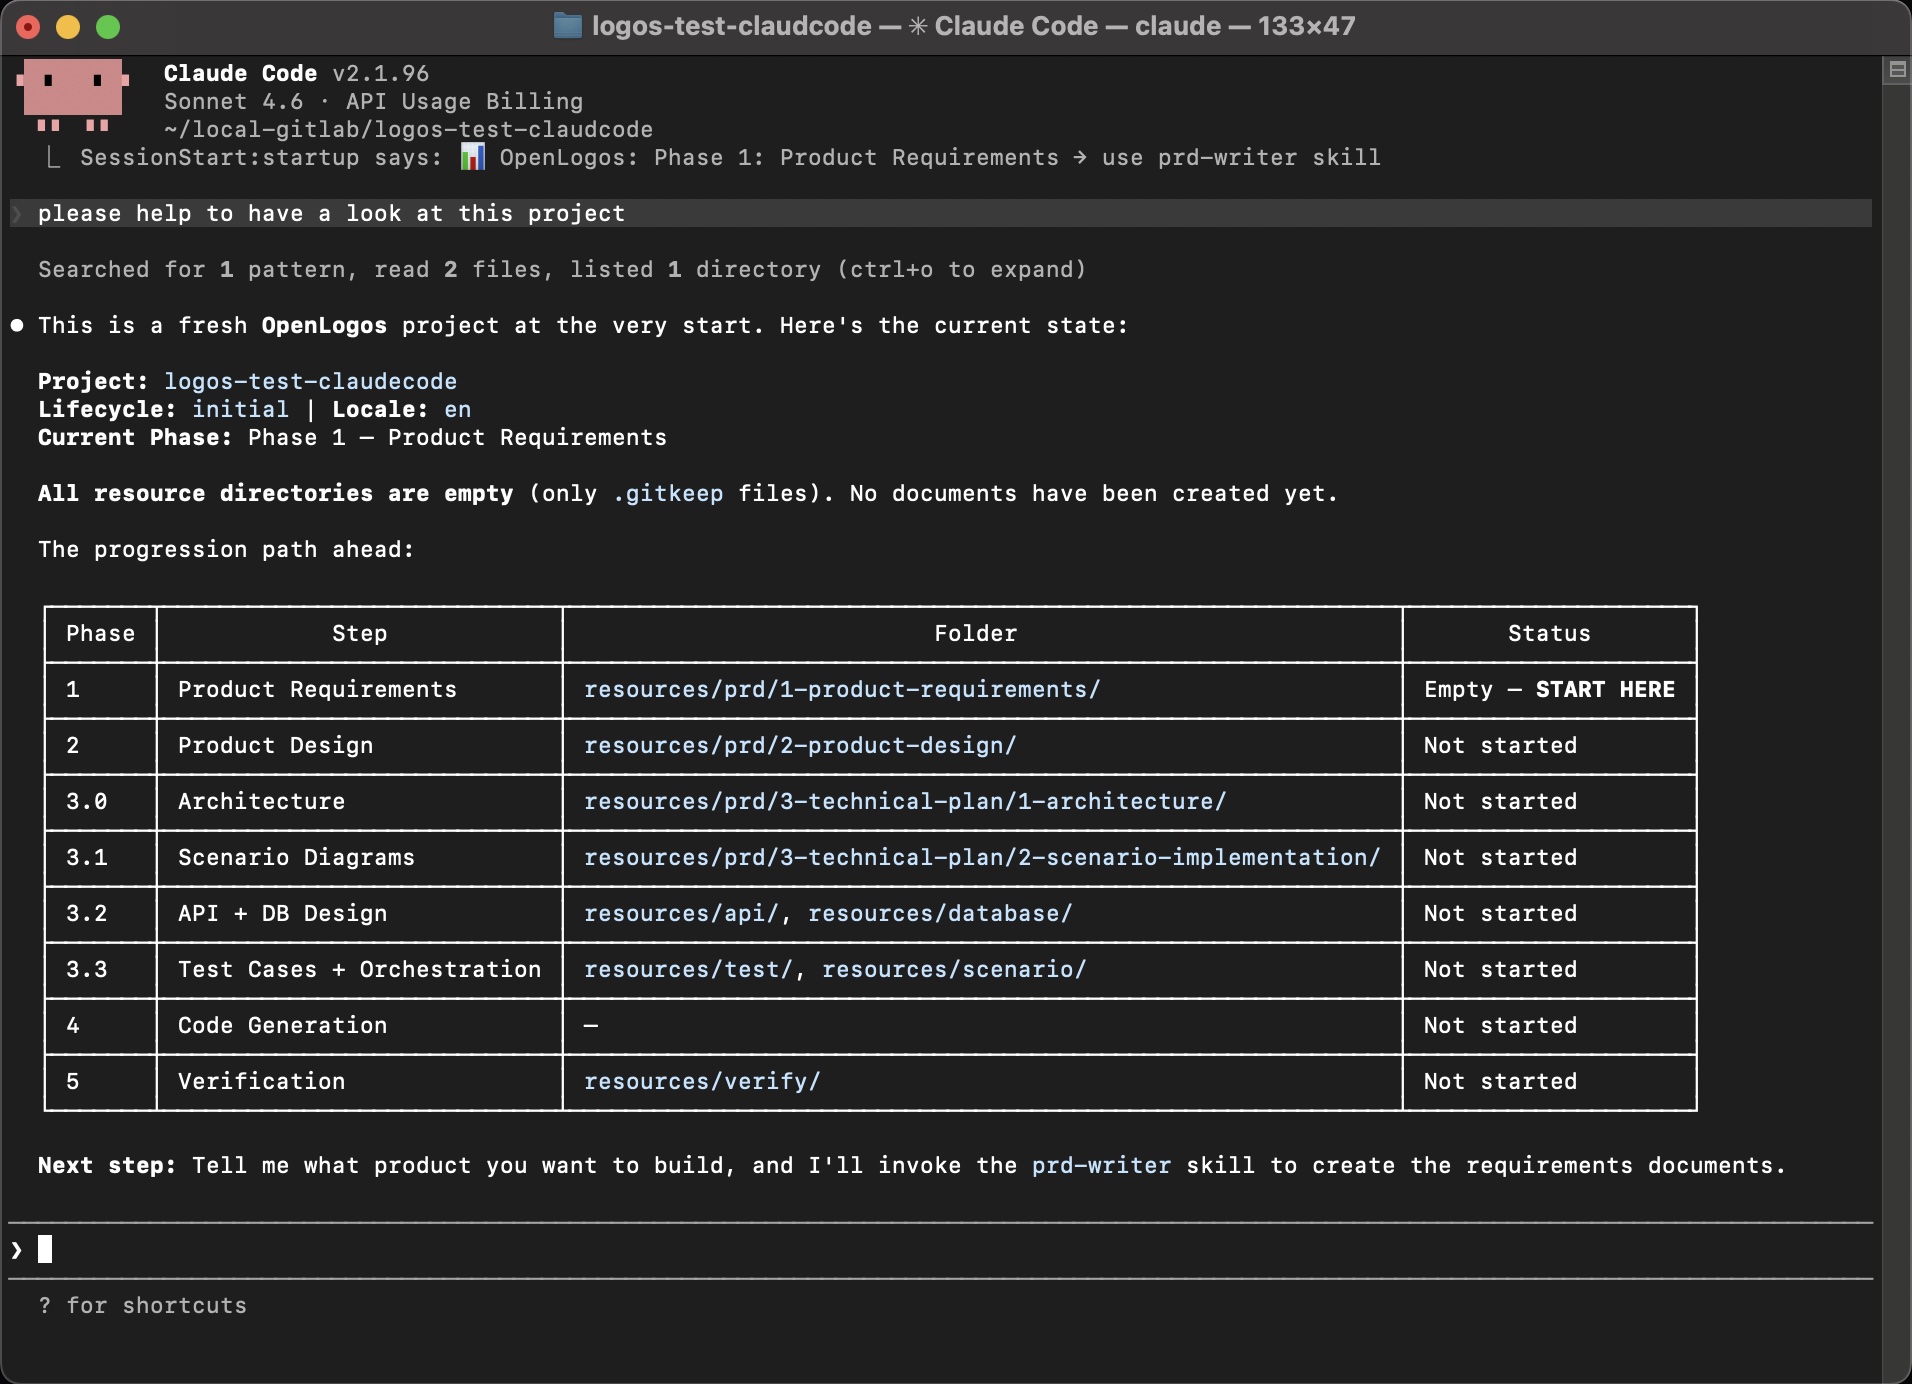
It shows the full progression path and identifies Phase 1 as the starting point with “Empty — START HERE”.
Navigate to the project and start OpenCode:
cd my-projectopencodeOpenCode reads the project configuration and displays a detailed overview:
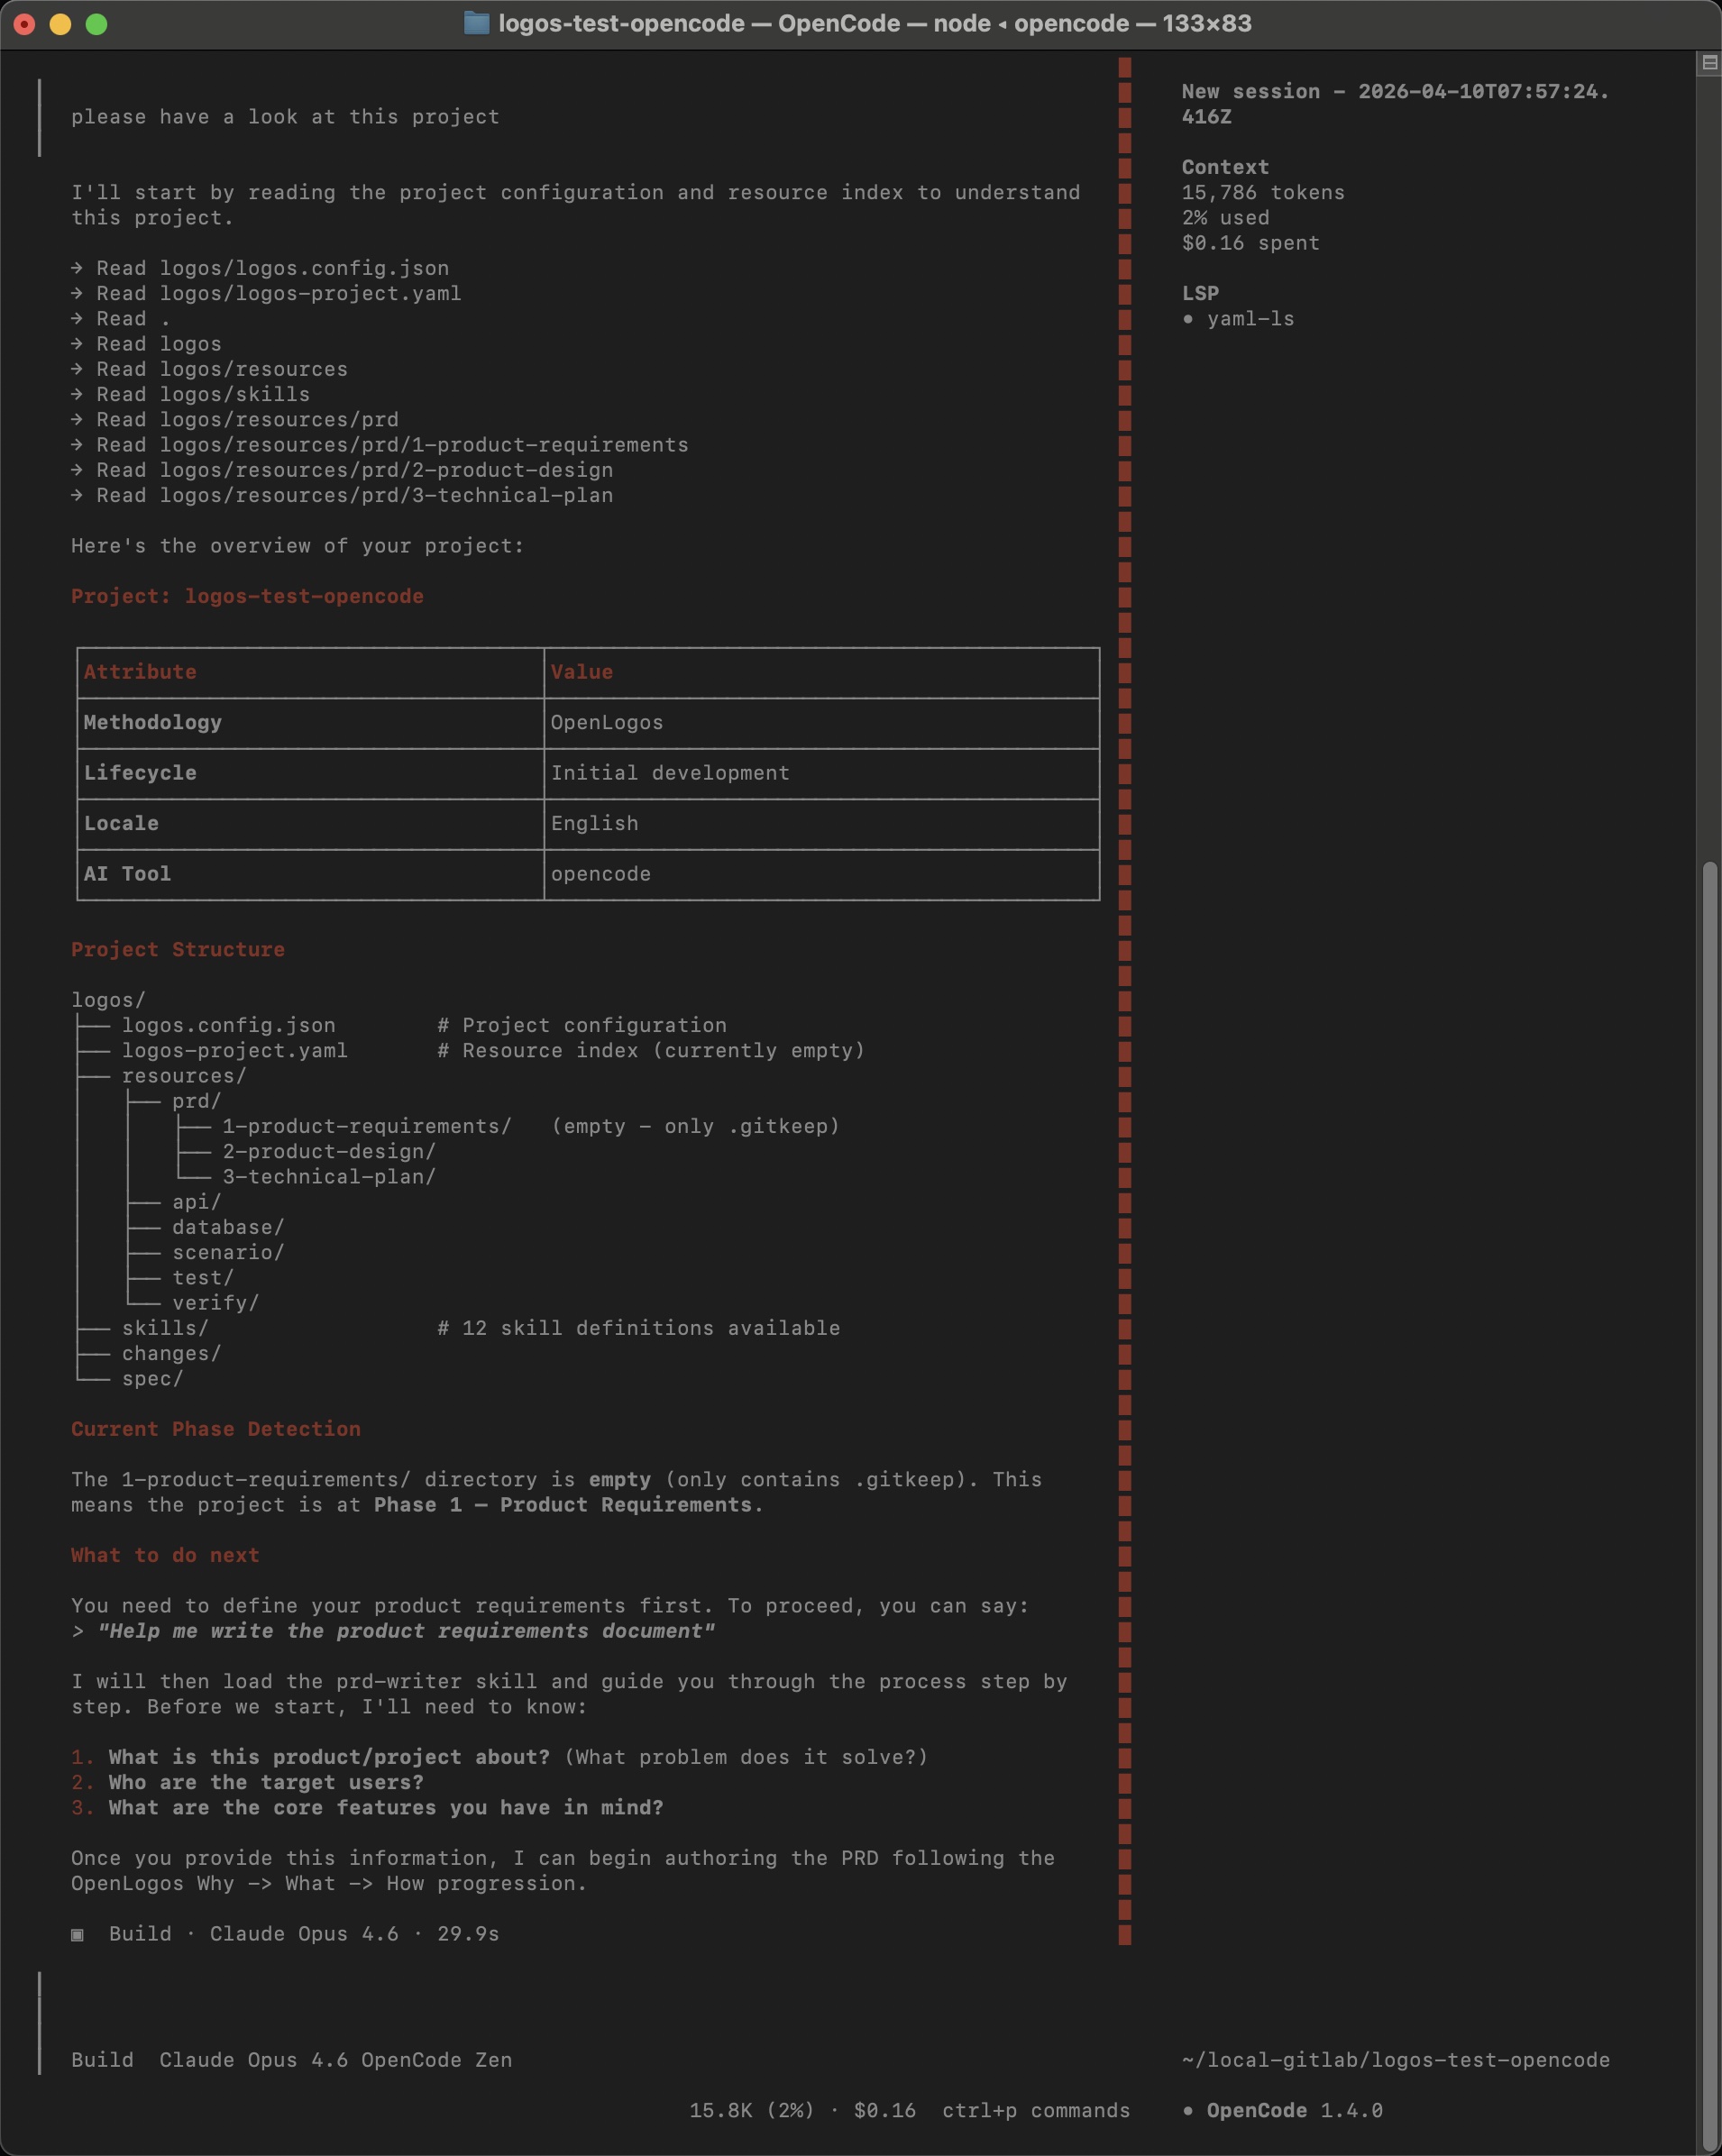
It shows the project structure, detects the current phase, and even tells you exactly what questions it needs answered to begin.
Open the my-project folder in Cursor. The 12 OpenLogos rules are auto-loaded from .cursor/rules/ — no manual configuration needed.
Ask the AI to review the project, and it will show you the full phase progression:
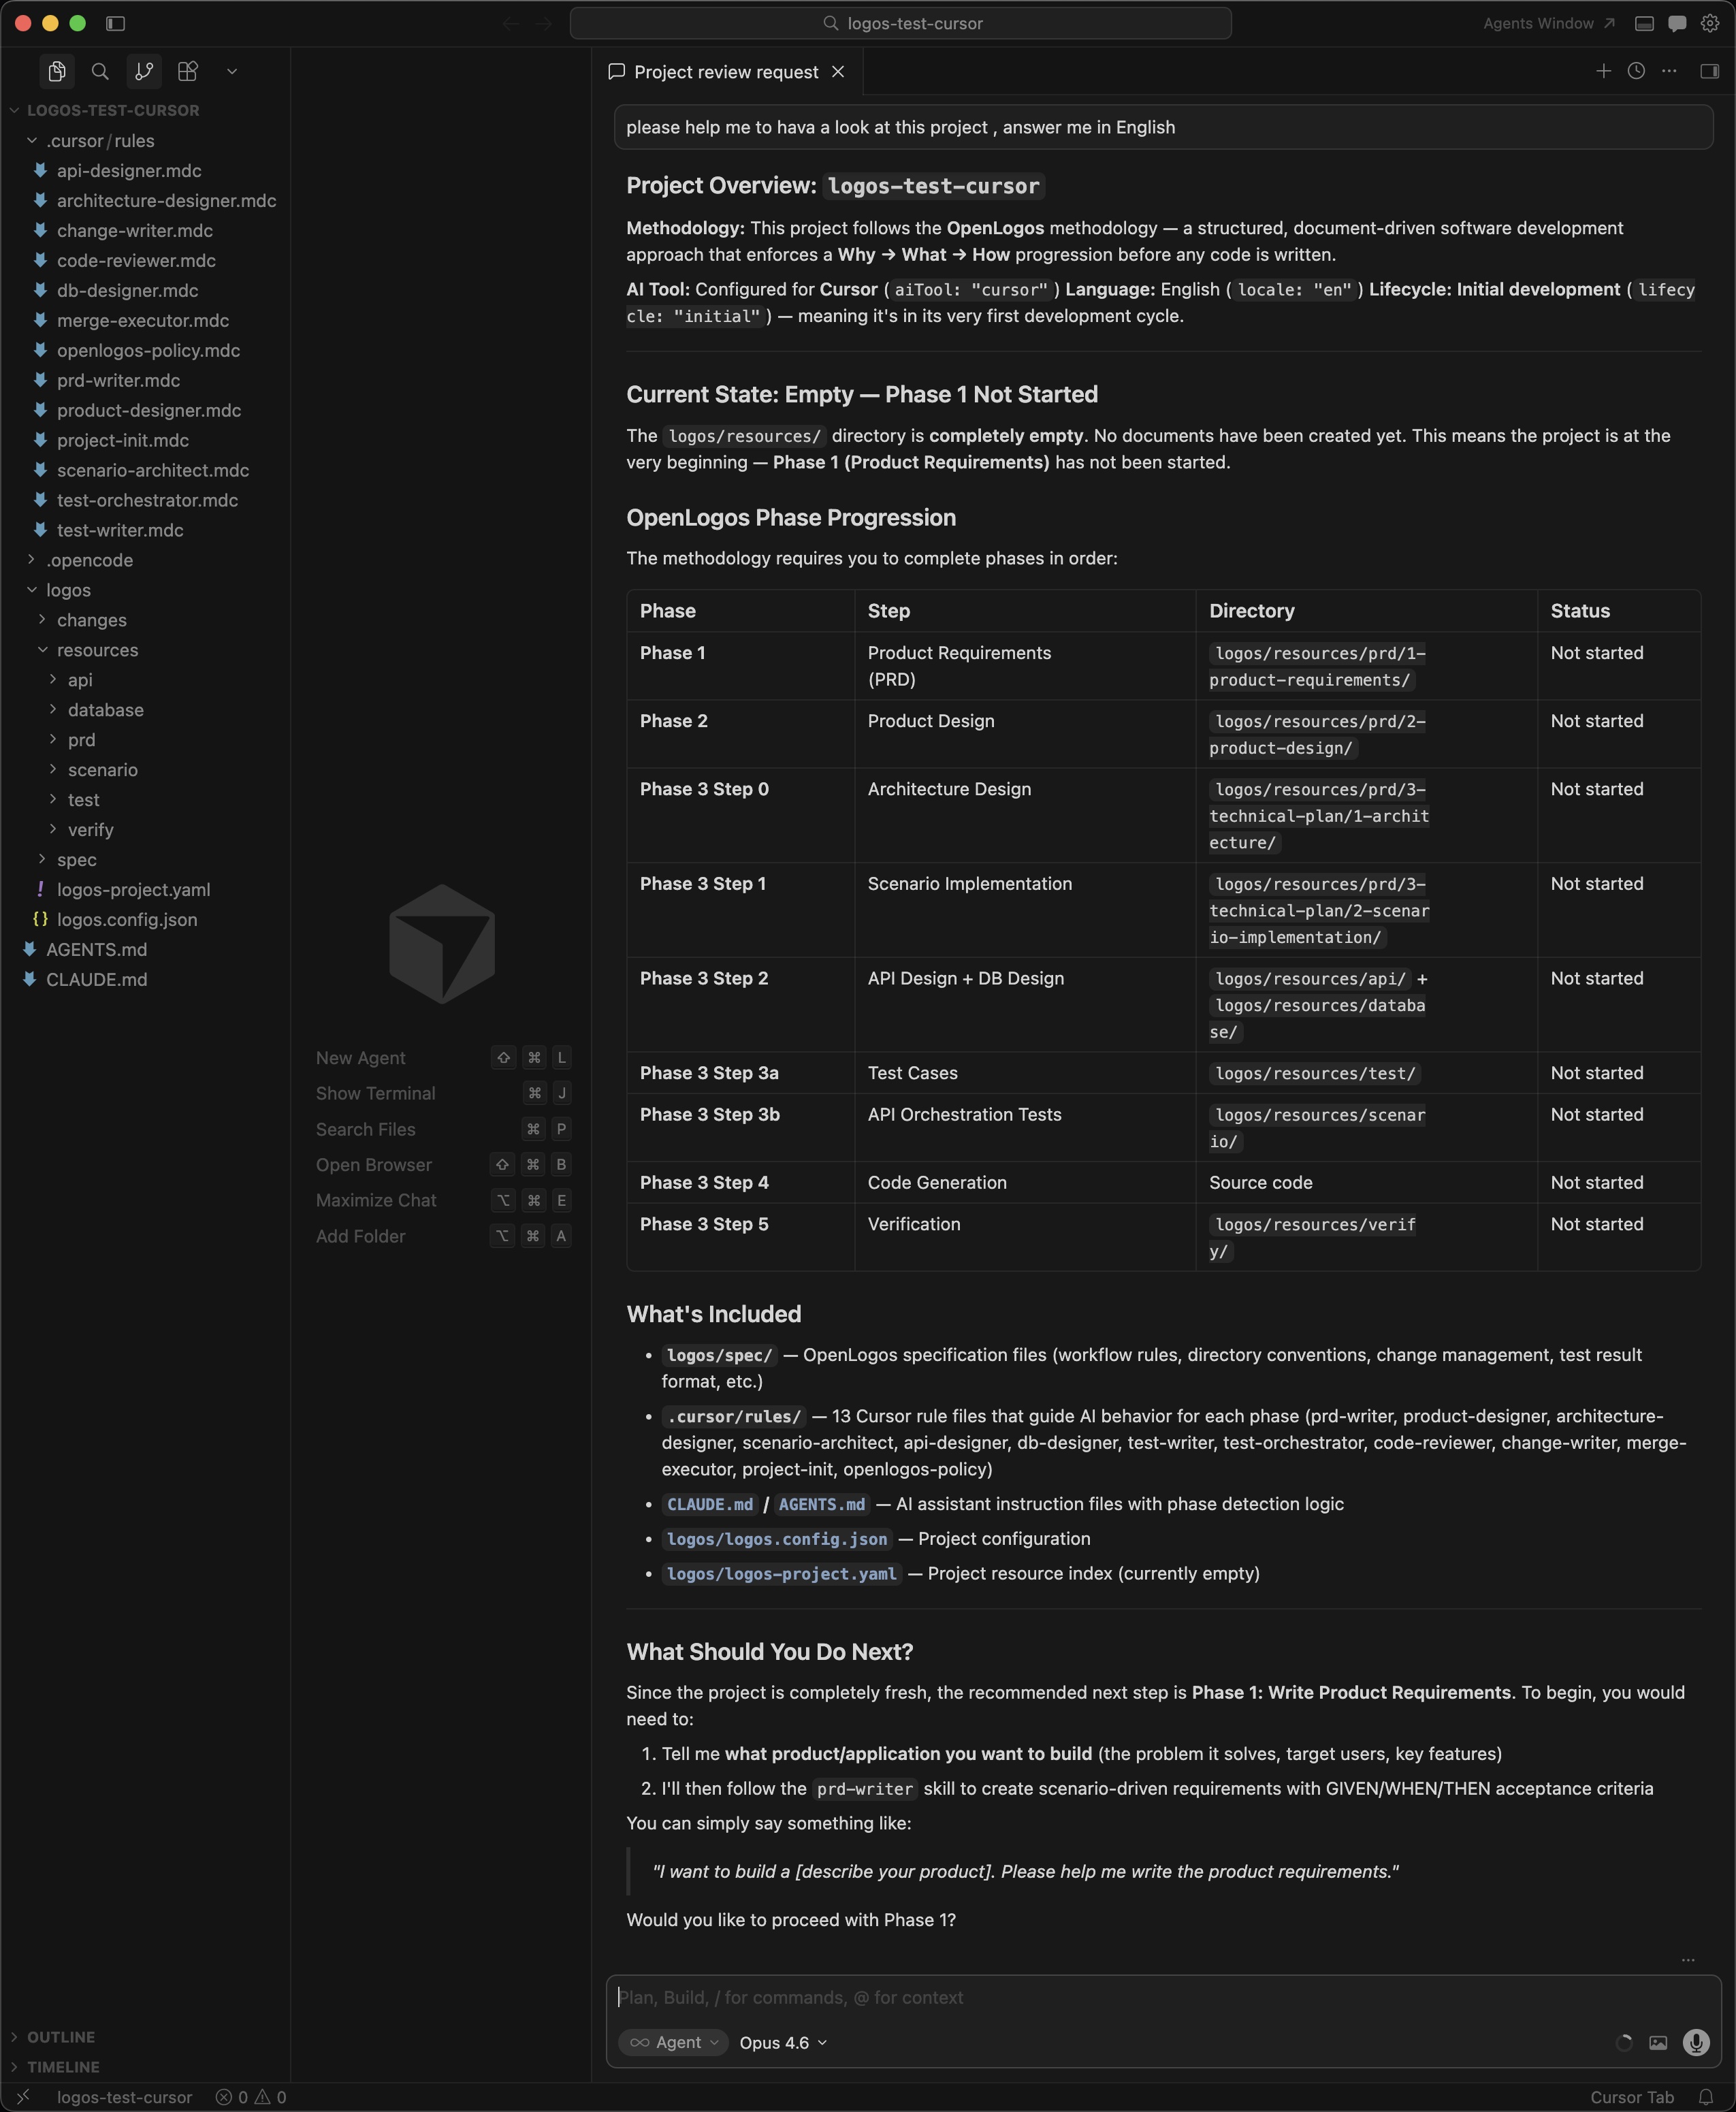
The AI detects all phases, shows which directories map to each step, and suggests starting with Phase 1.
Step 4: Your first AI collaboration
Section titled “Step 4: Your first AI collaboration”This is the moment of truth. Tell the AI:
“Help me write the requirements document”
The AI loads the prd-writer Skill and asks you three questions:
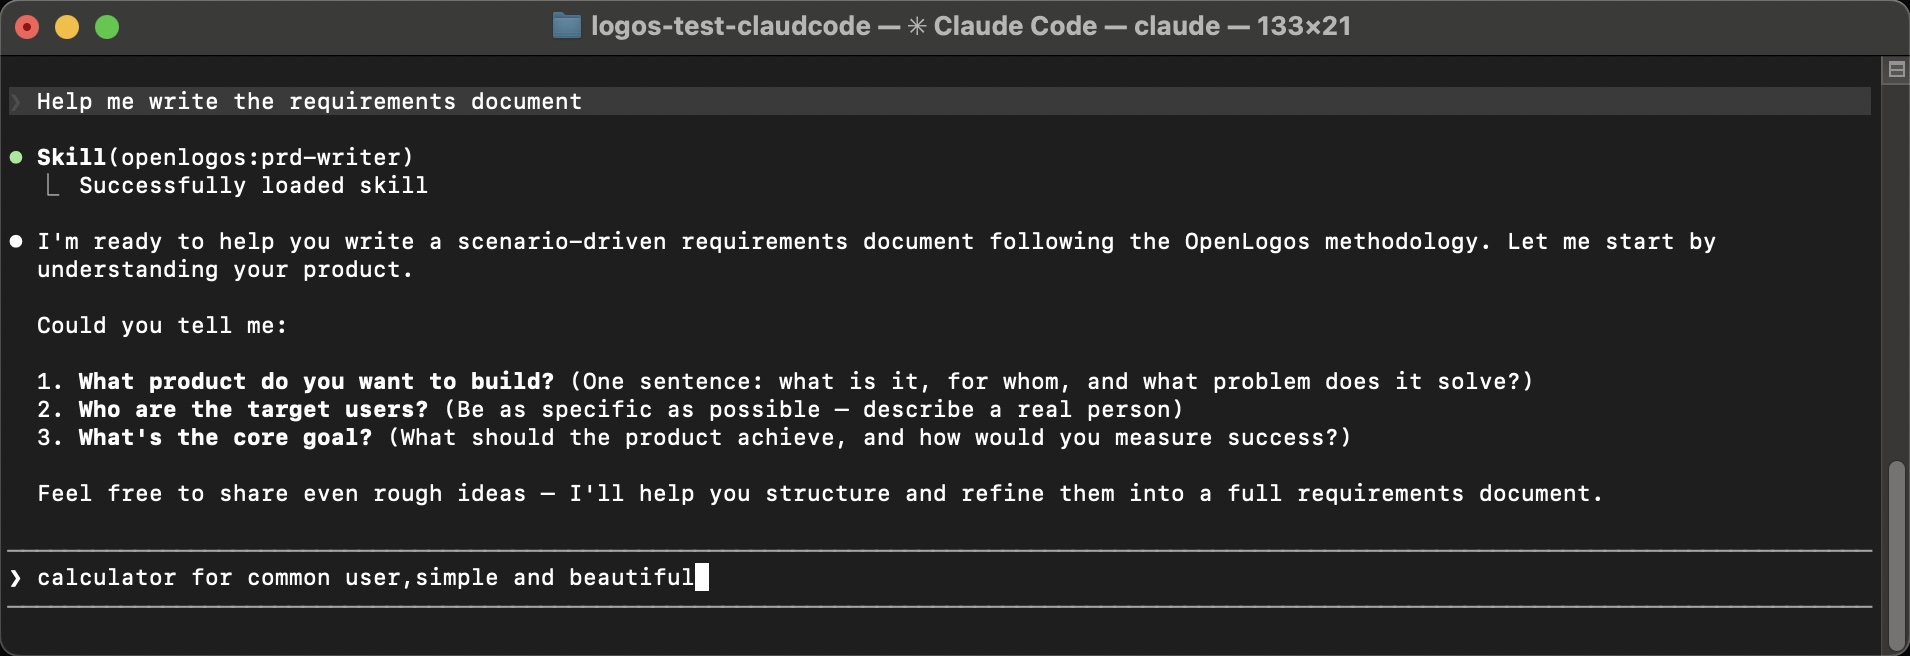
- What product do you want to build? (One sentence: what is it, for whom, and what problem does it solve?)
- Who are the target users? (Be as specific as possible — describe a real person)
- What’s the core goal? (What should the product achieve, and how would you measure success?)
Answer with even a rough idea — for example:
“calculator for common user, simple and beautiful”
The AI takes your brief input, asks a few follow-up clarifications, then produces a complete, structured requirements document:
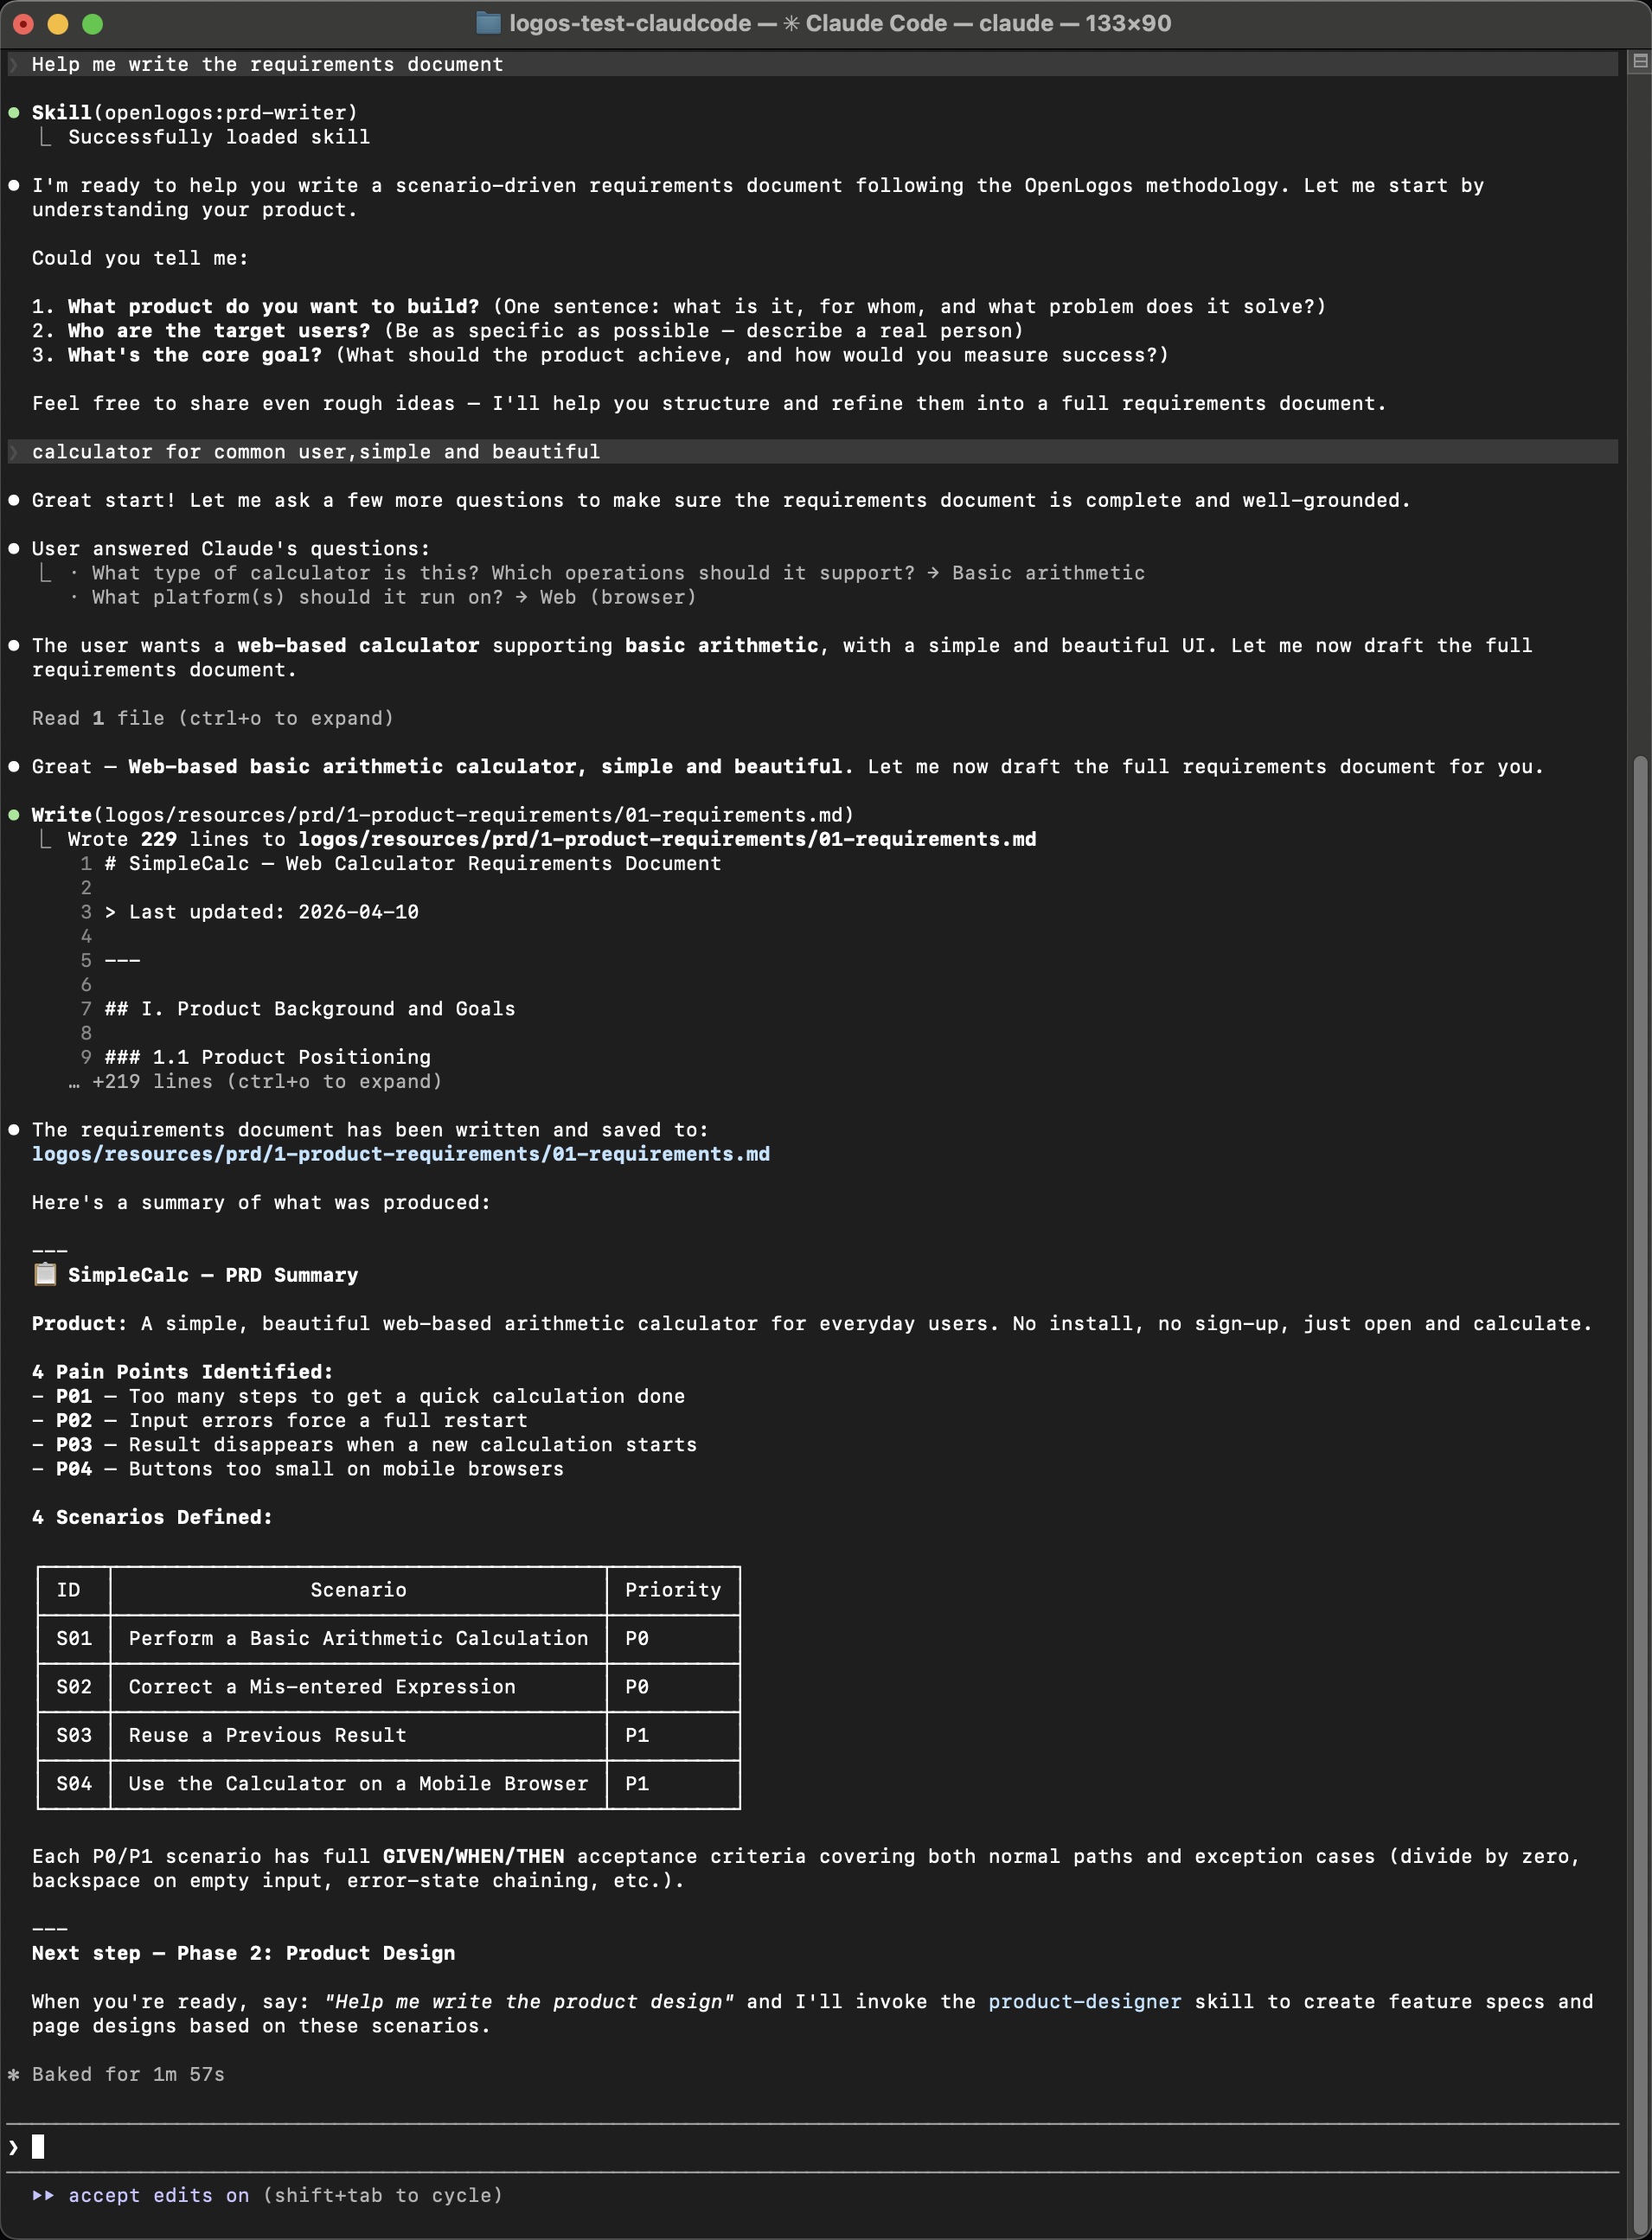
In about 2 minutes, it generates a 229-line requirements document with:
- Product positioning and core objectives
- Target user persona
- Pain point analysis (P01–P04)
- 4 scenarios (S01–S04) with priority levels
- Full GIVEN/WHEN/THEN acceptance criteria for each scenario
- Constraints, boundaries, and a “Won’t-Do” list
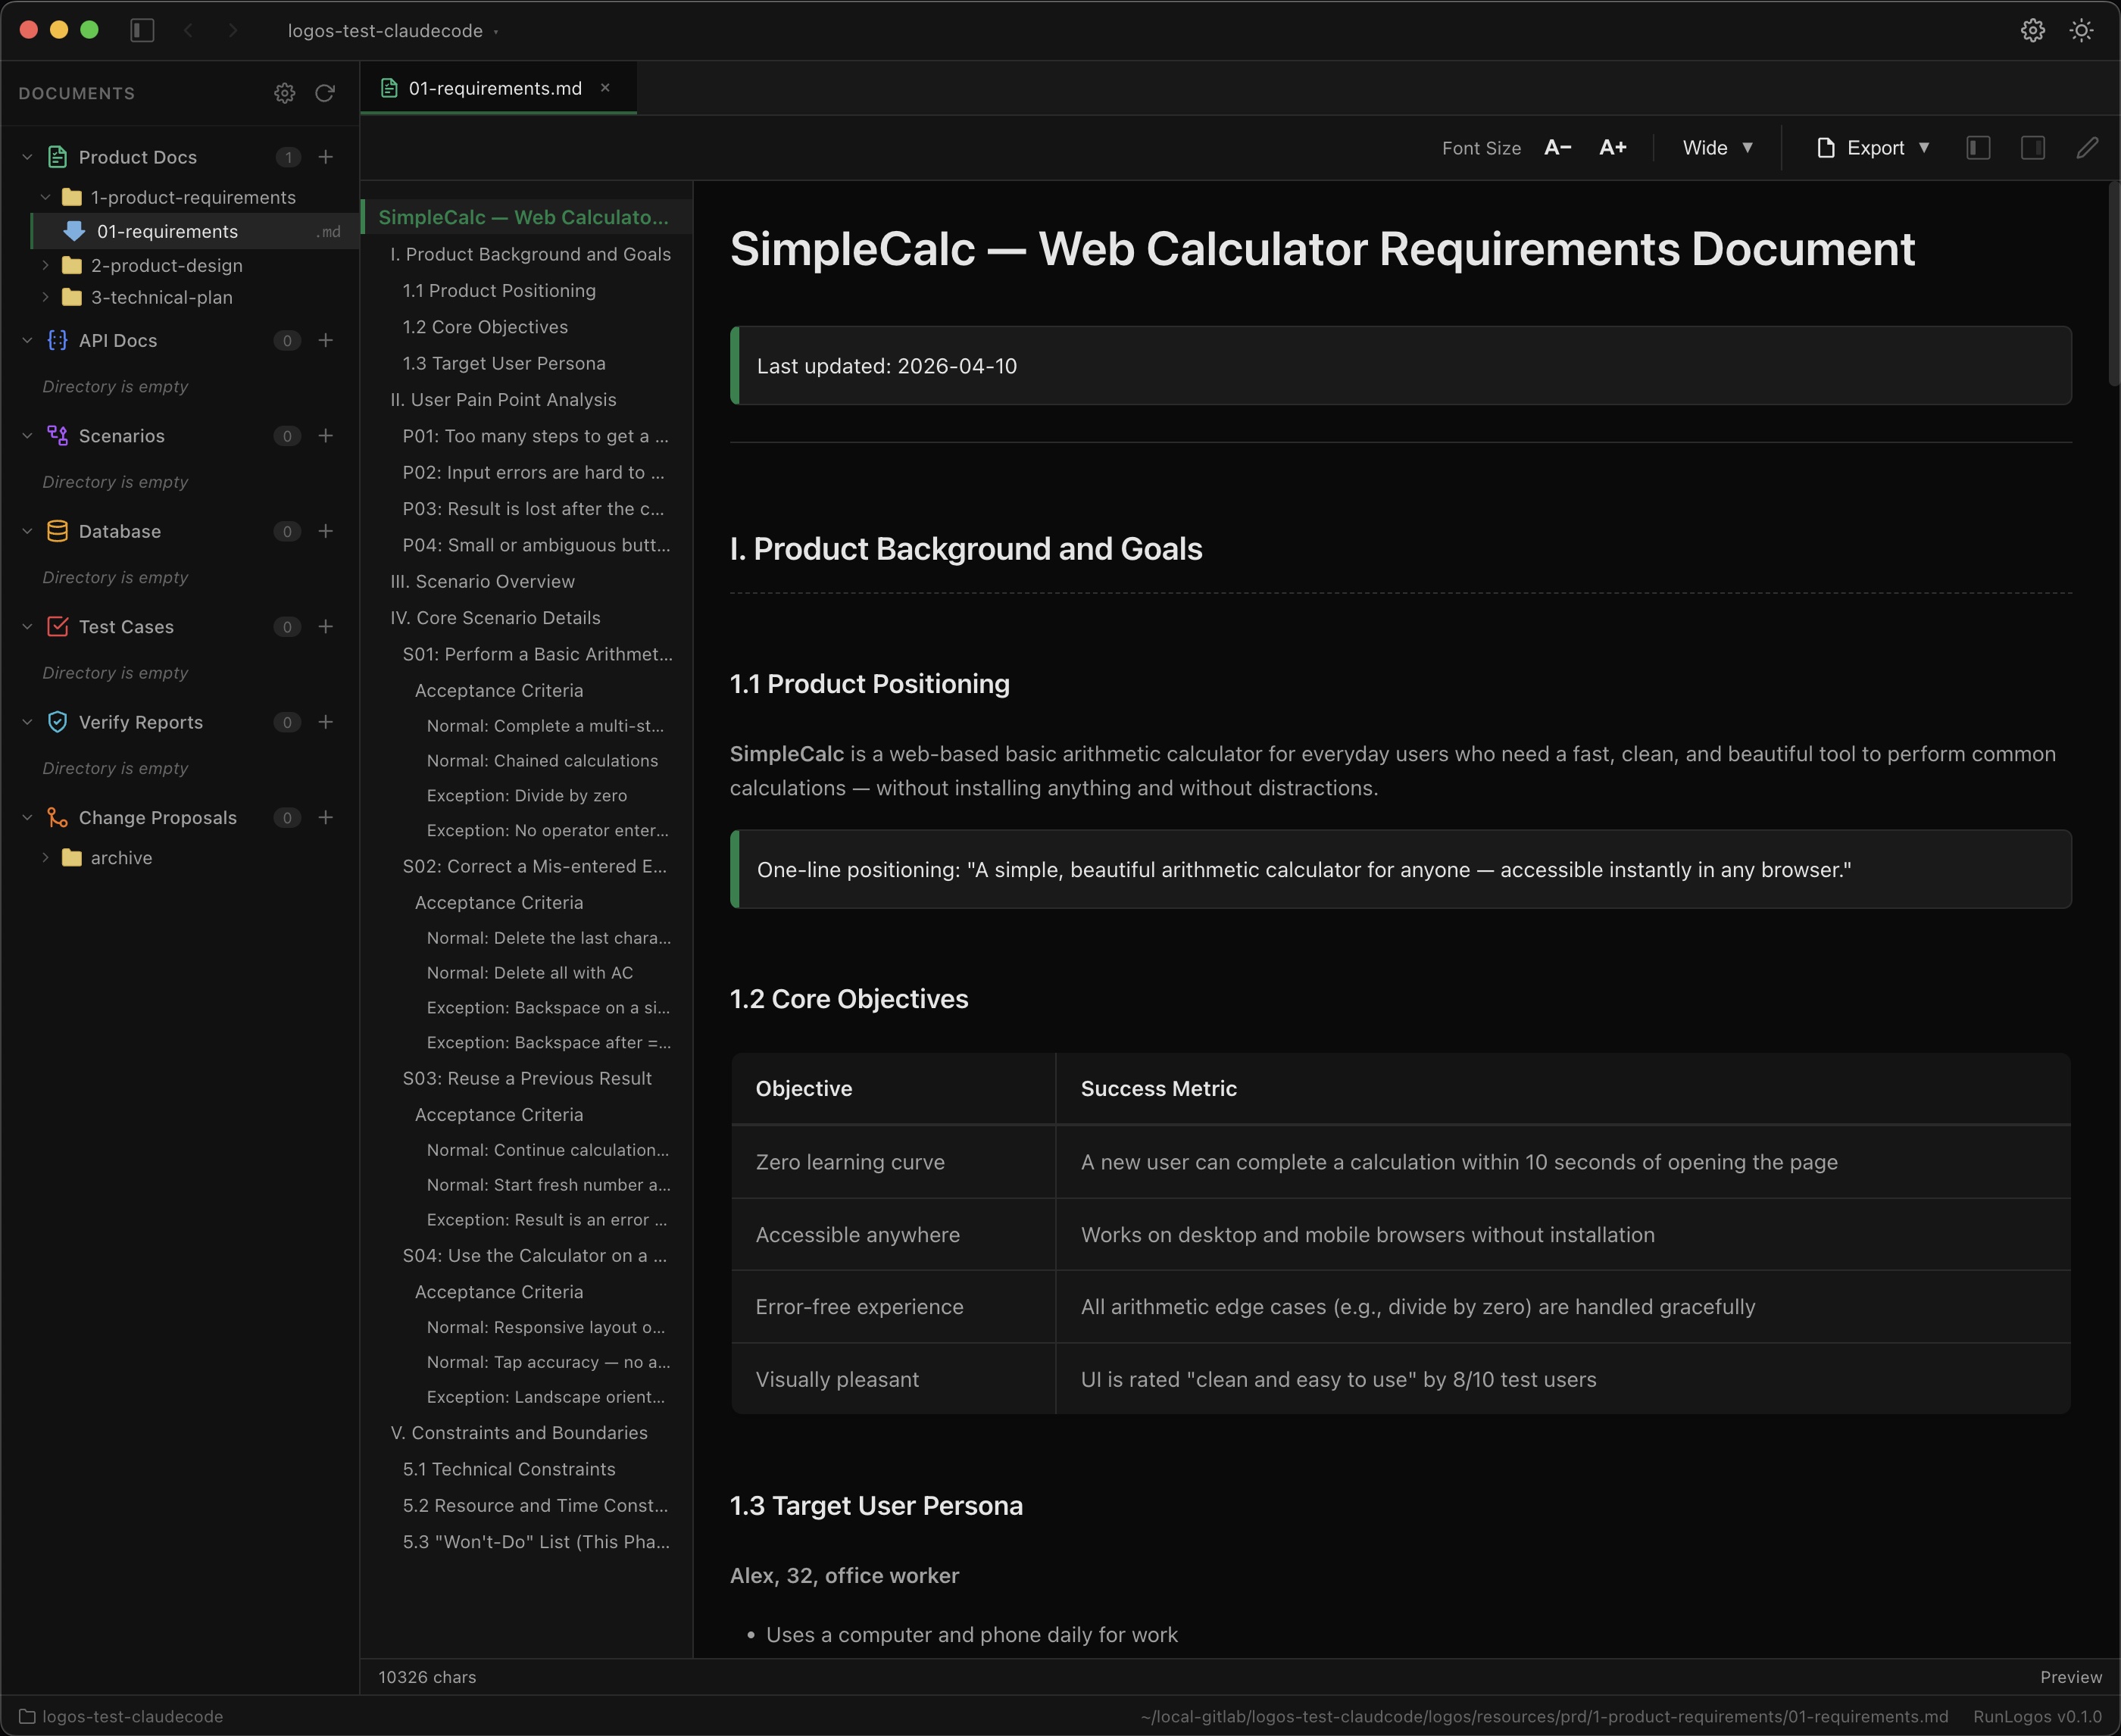
The document is saved to logos/resources/prd/1-product-requirements/01-requirements.md — and it’s immediately viewable:
Step 5: Check your progress
Section titled “Step 5: Check your progress”Now run the status command (or use the slash command in Claude Code):
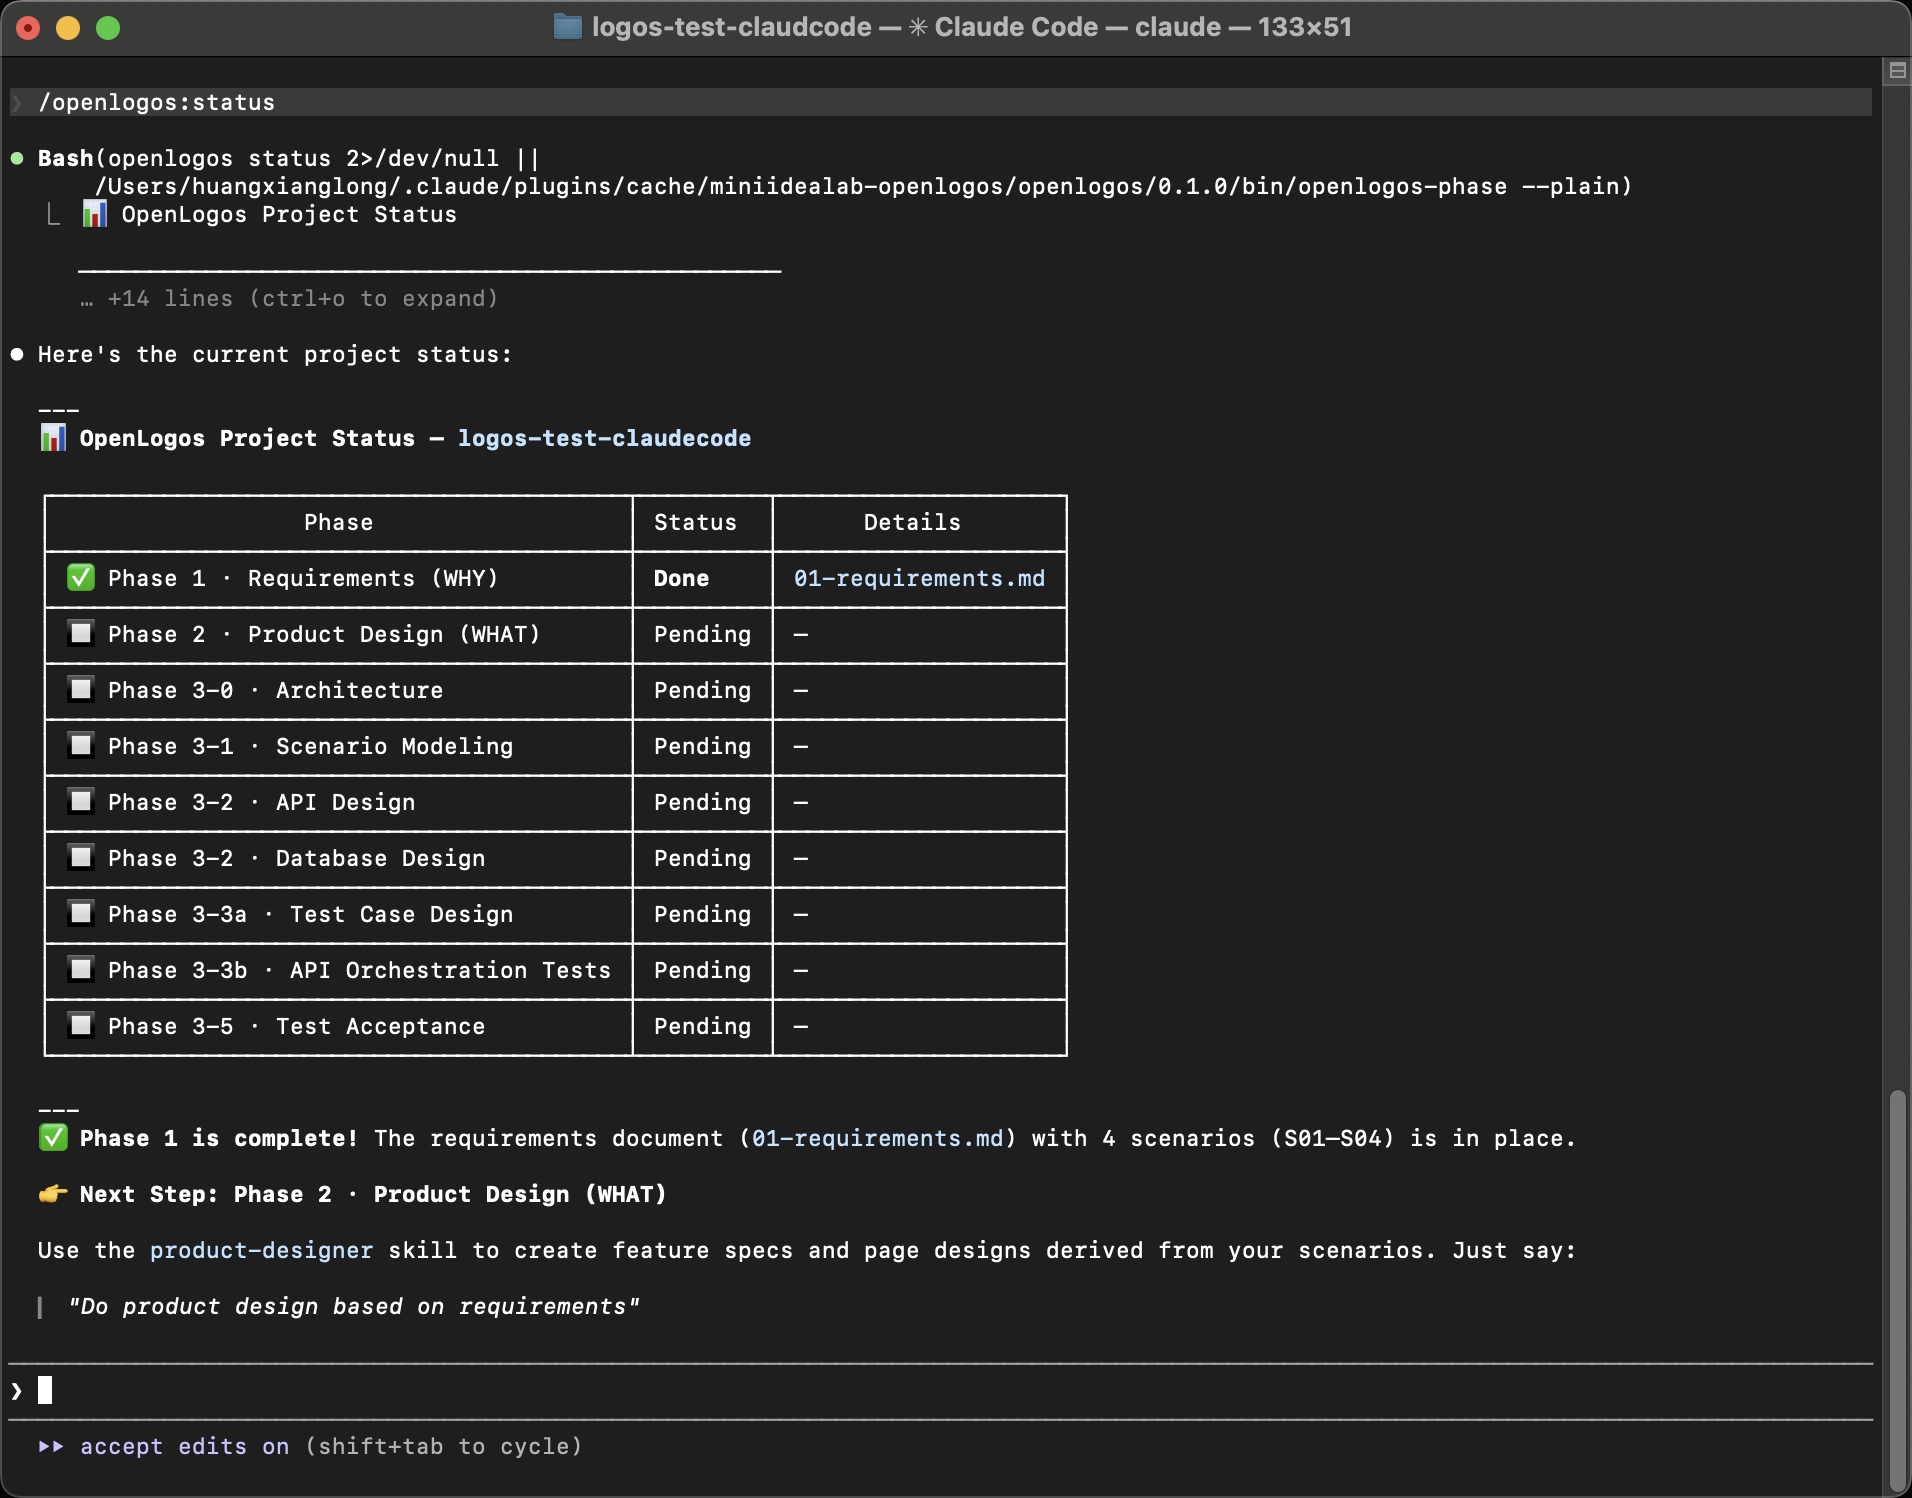
Phase 1 is marked as Done. The AI confirms:
- ✅ Requirements document (
01-requirements.md) with 4 scenarios (S01–S04) is in place - 👉 Next Step: Phase 2 · Product Design (WHAT) — just say “Do product design based on requirements”
You’ve completed your first full cycle of the OpenLogos methodology. Every subsequent phase works the same way: the AI reads the previous phase’s output, loads the appropriate Skill, and guides you through the next step.
What’s next?
Section titled “What’s next?”You now have a working OpenLogos project with a complete requirements document. Here’s where to go from here:
-
Continue building — Tell the AI “Help me create the product design” to move into Phase 2. Each phase builds on the previous one, all the way through to verified, tested code.
-
See real projects — Visit the Tour to see OpenLogos applied end-to-end on two real projects: FlowTask (Rust/Tauri) and Money-Log (Electron).
-
Understand the concepts — Read the Core Concepts to understand the WHY → WHAT → HOW model, scenario-driven development, and test-first methodology.
-
Explore the toolchain — Check the CLI Reference for all 14 top-level commands and the Skills Reference for all 16 AI Skills.